Without further ado, here is my finished Collar de Pilar hand-knitted tee:
I am crazy about this top. It is fun to knit. It is fun to wear. In fact, I’ve been wearing it everywhere since I finished it.
The tee was designed by Kate Davies. I loved this design as soon as I saw it, and purchased a kit from Kate Davies’ shop in 2022. This was just before I caught Covid, and I put the kit away; my covid-induced brain fog led me to choose very simple patterns for some time afterwards. Recently, I needed a project for a long plane trip, found this kit in a box, and realised the time was ripe to cast on.
I knitted it in the original colour scheme using Kate’s own Milarrochy Tweed yarn. It is the first time I’ve used it for a garment, and I was a little worried that it would be itchy next to the skin. I finished it as the pattern suggests, with a dab of hair conditioner in the rinse water, and it bloomed and softened beautifully.
My gauge was off for this. The pattern calls for a stockinette gauge of 28×36. My washed and blocked swatch gave me 24×40 with a US3/3.25mm needle. I know that I could have re-swatched with a smaller needle size and probably have gotten gauge, but I liked the way the fabric looked and felt with the size 3, so I decided to keep it.
To account for the different stitch gauge I knitted a size 4, instead of a size 6. Because my row gauge was also off, I added about 10 plain stockinette rows before starting the patterned yoke. It was a bit of a gamble, but I tried it on multiple times while knitting, and I think the fit is perfect.
I was surprised that it looks good with many different outfits, and have worn it both for work and play.
I highly recommend this pattern. Kate also gives instructions for long sleeves. The university has closed for 5 days for Easter. Yay! A mini-break. I have a new project on the needles, a new book to read, and the flowers are blooming. What more could I ask for?
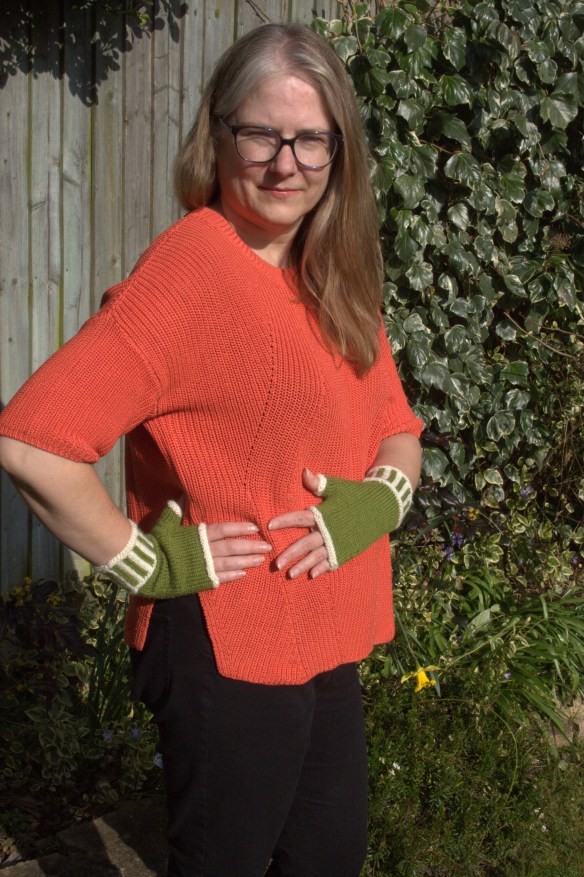
I love my Hirne cardigan so much that I decided to knit another one. This time, I chose to knit with mohair, in a knock-your-socks-off glorious orange-y red! This cardigan pops!
In fact, it pops so much, that it is very difficult to capture in a photograph. Suffice it to say, if you saw it in real life, it would have you smiling. It’s hard to resist a good red!
Hirne is a fantastic pattern by Kate Davies. As with the last time, I knitted it flat (back and forth in one piece, rather than in the round and steeked). This is a fairly straight-forward modification.
I was worried that the textured pattern in the yoke, made with twisted stitches, wouldn’t show up in the mohiar, but it looks fantastic.
For comparison, below is my original Hirne, knitted in Kate Davies Ooskit yarn. It is a really lovely neutral knit, and I have been wearing it almost constantly since I finished it at the beginning of the year. (See my blog post on the first Hirne here.)
I love the way that you can make the same pattern twice and yet by experimenting with yarn and colour, you can make something unique.
I rarely knit the same pattern twice, and almost never with a garment. I am not sure that I have done so since I knit Audrey by Kim Hargreaves for myself and then for Emma over 10 years ago (see my posts here and here). One advantage of knitting the same pattern is that the project flew off the needles: it took me four months to knit the first Hirne and six weeks to knit this one!
For this version, I used 10 balls of Gepard Garn Kid Seta in shade 1008, which I purchased at Ulstedet in Copenhagen (blogged about here). I held the yarn double throughout.
I have always worn bright colours, especially red, and I gravitate more and more to them as I get older. They are really good at mood-boosting. I find that this red looks good with so many things in my wardrobe. I know it will get worn often.
It is amazingly light (it weighs in at under 250 ounces, or less than half a pound). This means it is just the right thing to throw in a suitcase. And for such a lightweight garment, it is surprisingly warm and cozy.
Its been a beautiful Bank Holiday Weekend here in England! I hope you have had some sunshine and maybe a pop of colour where you are.
I am so happy to be able to show you photos of my completed Myrtle tank:
We are in the midst of a drought and a heat wave here, so we’ve struggled to find a bit of cool to take these photos. Notice how the cool greys of the stones above bring out the cooler tones, and the green background below brings out the warmer tones.
Myrtle is a great design by Kate Davies. Her pattern calls for mohair yarn and long sleeves and looks deliciously cozy and stylish for a walk in the crisp air, see below photo. I have wanted to make one since the pattern first came out, in her book, The West Highland Way, in 2017. (This is the second project I’ve knitted from this book: the first is my Highland Rogue Cowl, which I blogged about here.)
I took a detour from the Highland Way and made my Myrtle as a summer-y tank top. I think it really works!
The colours are not in my normal palette. In fact, this yarn was originally purchased as a kit to make a shawl, and one day I suddenly had the inspiration to use the yarn to knit a summer-y version of Myrtle (you can read about it in this earlier post). Here is the yarn:
Madelinetosh Merino Light in Sugar Coat, Pink Clay, Librarian’s Dreams, Joshua Tree, and Rocinante
The unintended result was that the process became a bit of a puzzle with some yarn chicken thrown in: the shawl kit contained two full skeins and three partial skeins and I had to make decisions in order to get the look I wanted while being limited by the amounts.
I ran out of the darker green first (you can see that there are five repeats of each of the other colours, but only four of the dark green). The colour that I liked the least at the beginning, the lighter green, ended up surprising me: in fact I chose to make the arm and neck ribbing from this shade instead of the white as I originally planned. I quite like it.
I choose to knit two rows of rib with the white before switching colours in the arm and neck rib, in order to imitate the two rows of white stockinette between each lace panel in the pattern. It makes a very neat touch.
This project has been a long time coming. I started this last summer, and at the time I was planning on making a tee. I finished the front and back, but was running out of both the dark green and the dark rose shades, and was struggling with matching up the concept in my head with the yarn at hand. I put it aside while I tried to talk myself into short sleeves using only the three lighter shades, or some subset thereof.
It then got usurped completely when I decided to take on a big project for my daughter Emma, which had to be finished for Christmas. I finally decided to skip the short sleeves and turn it into a tank, and picked it back up again. When I had only about 5-6 hours of work left to complete it, I got Covid. It has taken me over 8 weeks to put in the few hours to complete it and to find the energy to photograph it. (I have been tempted to wait another few months to take photos, since not only have I been sick for 8 weeks, but I look like I’ve been sick for 8 weeks. Doug says you won’t care.)
I really enjoyed every aspect of knitting this. I especially liked the surprise involved in taking one of Kate’s beautiful patterns and changing it up, and having it turn out even better in real life than it did in my head. This is the second time in two years I have done this with one of Kate’s pattern: the first was the Ursula waistcoat I knitted for Doug last year.
It’s lovely, isn’t it? I like the fact that I can dress it up or down, wear it with jeans or under a jacket. And I am pleased to go outside of my colour comfort zone.
I’m happy to be slowly recovering and picking up my knitting again. Take care, everyone!
I have made some progress on my summery Myrtle tee. It is knitted entirely in lace, on US2/2.75mm needles, so the progress has been a bit meandering. Nonetheless, I have finished the body of the top, having shaped the armscyes and neckline, and then used a 3-needle bind-off to knit the front and back together at the shoulders. I think it looks rather pretty.
The yarn is Madelinetosh Merino Light in Pink Clay, Sugar Coat, Librarian’s Dreams, Joshua Tree, and Rocinante. I didn’t buy this yarn for this pattern, but rather am re-purposing the yarn from a kit I purchased to make a shawl (the Scout Shawl – which I blogged about here). The kit contains two full and three partial skeins of yarn (enough of each to knit the shawl) and this means that I have had to struggle with how I utilise the colours in the Myrtle. I ran out of the Joshua Tree (dark green) colour after knitting 4 pattern repeats; thus, you can see that the top repeat and a half utilise only four colours instead of five. I am very shortly to run out of the Rocinante (the terracotta-rose colour) as well; I am hoping that I have enough Rocinante left for one pattern stripe on each sleeve. The only colour I have an abundance of at this point is the Pink Clay, although I do have enough of the Sugar Coat (white) to finish all of the ribbing.
The top is a bit shorter than I would have wished – if I wasn’t worried about running out of yarn I would have added another stripe or two before binding off for the armscyes. And it is a bit on the clingy side as well – having decreased both the stitch count and the needle size after an earlier attempt was turning out too big. However, I am fairly confident that the magic of blocking is going to fix both of these issues. I am still pondering what to do about the sleeve shapings. I plan to knit short sleeves, with two or three bands of horseshoe lace pattern and then some ribbing. However, if you look at the original pattern (by Kate Davies), you will see that the shoulder is dropped, and so the sleeves are formed by picking up around the armscye and then knitting directly in pattern, without any short row shaping to form a sleeve cap. I am afraid that that won’t work here as the shoulders are definitely not dropped. So maybe I will need to angle the first pattern stripe or two with some short rows, to bring down the shoulders? I’m not sure yet how to solve this. But such is the fun of knitting. I like these creative fiddlings one must make to bring it all together, especially when one’s gauge is off, as mine is here.
Below you can see the back. I completely love these colours together, and note that they are outside of my usual palette, which is kind of fun.
I had an email from Loop this week (the lovely London yarn shop from which I bought this yarn kit). It contained the following workshop announcement: “Liz Baltesz will teach you to knit the Scout Shawl on 3 October. If you can knit and purl you can make this!” I had a good giggle over this. I gather I am not the only one that purchased the kit at first glance, having fallen hard for the shawl, and then had the daunting prospect of knitting it sink in. If I hadn’t already re-purposed the kit, I would likely take this course. Not because I couldn’t have figured it out myself (I know that I could) but because sometimes it is nice to have companionship on the journey and someone to pat you on the shoulder and say “there, there”. If any of you London-adjacent readers take the workshop, do let me know how it turns out.
I am thrilled to be able to show you some photos of the waistcoat I knitted for Doug.
I am really pleased with how it turned out. It fits! (My measurements told me that it was going to fit; but we all know that, in knitting, measurements sometimes lie.) Most important, Doug likes it too!
Those of you who follow this space will know that the waistcoat/vest was a very long-term project, something which percolated in the back of my mind for some years before I finally set my yarn to needles. Most of that time was spent in trying to find a pattern that I liked and wanted to knit. I had some parameters – Doug wanted it to button down the front, I wanted to try my hand at knitting a stranded garment and steeking, we both wanted it to be colourful and interesting and fun, and furthermore, because this (a steeked, stranded garment) was all new to me, I wanted it to feel achievable – with a small, controlled number of colours and a pattern that was cool but uncomplicated. Try as I might, I could not find any vest patterns that I liked.
I kept coming back to Ursula [Ravelry link]; a very nice women’s cardigan pattern designed by Kate Davies. It had all of the features I wanted – a small, regular fair isle pattern that was easy to memorise, that was well-suited to colour exploration, and that looked intrinsically cool and pleasing. Most of all, the pattern was written by someone I trust to get the details right and to write them in a way which worked for me. Having knitted several of Kate’s patterns previously, I knew that she could walk me through a process, even one which pushed against my comfort zone.
Of course, I had to do a bit of pattern tinkering to take a women’s cardigan and produce a man’s waistcoat. I followed the pattern exactly for the size 48, until I got to the underarms. Then I had to do lots of calculations. I added some length to the garment, both above and below the armholes, and I made a V-neck. I calculated and measured ad nauseum, to try and ensure that the slope of the decreases at the arm would work and that the shoulders would fit properly and lie nicely. Although I would tweak a few things here and there if I were to do it again, I am happy with the results.
I used Shetland wool, which is amazingly easy to steek. It is “sticky” and has great stitch definition. This vest is knitted with Jamieson’s Shetland Spindrift in the shades Shlomit (an undyed shade), Conifer, Raspberry, and Loganberry.
As I knitted this, I became more comfortable with stranded knitting. There are lots of different techniques for stranding; I tried lots of them to see which worked best for me. The one I ended up sticking to was holding the background yarn in my right hand and throwing it and holding the foreground yarn in my left-hand and picking it. It eventually settled into a rhythm for me and I think it ended up with very neat stitchwork, with no pulling in and very even stitches. There are no very long floats and so I let them be and did not bother to catch them. Here, Doug is wearing it inside out so that you can see the reverse side:
Why do I keep switching between the terms waistcoat and vest? I think as an American living in Britain, my mind keeps toggling between the two terms. The difference seems to be regional, as well as one of quality (with a waistcoat being more formal). I have blogged about this project a lot so I will try not to repeat myself too much in this post. In case you are interested in some of the techniques, thought processes, or decisions involved, I have provided links below to some of the posts I’ve written previously which you might like or find useful.
Vests:
A baker’s dozen of men’s knitted vest patterns; this post from 2017 showcases 13 men’s vest patterns. I ended up not choosing any of them, but it is a good compilation of interesting patterns.
Ursula waistcoat:
Brownie points; picking the colours, swatching, choosing the type of ribbing. You can see that I had no idea what I was doing – I ordered more than twice the amount of yarn I would need.
Inauguration side effects; a humorous post about how changes in your stress levels is reflected in your stitchwork.
Knitting on instinct; this post goes into some details on shaping the armholes and neckline.
Steeking without tears; this post goes into a lot of detail on the process of steeking. It detailed why and how I picked up the stitches for the ribbing before cutting the steeks, and how I plotted, with extreme precision, to ensure that the buttonholes and the ribbing and the pattern would all line up precisely (it is a bit OCD).
I’m really happy to have finished my Treit pullover.
Treit (Ravelry link) is a lovely design by Kate Davies. The original pattern design is cropped and slightly boxy and looks great as a layering piece over a blouse. I choose to knit it with a linen blend, so in my head it took on a summer tee vibe rather than an autumn layer vibe. (Which makes it terribly inconvenient that I have finished it in October instead of May!)
The yarn is a wool and linen blend by Karin Öberg, called Kalinka 21, which I purchased from Ginger Twist Studio. It is 55% linen and 45% wool, sportweight blend that comes in some fantastic, bright shades. (This one is called Lime.) A 100 gram skein has 350 metres; I bought 3 skeins but knitted this tee with only two skeins! That makes this tee a super bargain! And see how beautifully it takes lace:
As with all of Kate’s designs, the pattern is beautifully written and edited with a great eye for the finest detail. The lace pattern is really pretty. It is a super fast knit. It took me exactly 4 weeks to knit this – and then another 4 weeks in which it hung around in a pile somewhere waiting for me to take the half hour necessary to graft the underarm stitches and weave in the ends.
I made the following adjustments:
1. I made it longer. This one measures 13.5 inches from the hem to the underarm, which adds 3 inches to the length.
2. I added waist shaping. I put in three sets of paired decreases and increases to add some shape at the waist.
3. I added fewer decreases at the neckline. The pattern in this size called for 108 stitches for the neck ribbing; I thought that would bring the neckline in too far, so on the last set of decreases, I made fewer of them, bringing the number of stitches down to 120 for the neck ribbing.
4. I knitted it with negative ease. I was a little under gauge, so I knitted the size 41 to get 39 inches at the chest, which gives 3 inches of negative ease.
These adjustments give it a more curvy shape instead of a short and boxy shape.
While waiting for Doug to fiddle with camera settings, I threw on a cowl to keep warm and sat down with my knitting to knock out a row. Doug snapped a shot:
I realised that I was wearing a Kate Davies-designed tee with a Kate Davies-designed cowl (knitted in Kate Davies wool), while knitting another Kate Davies design. Do you sense a theme, here? (I blogged about the lovely cowl here.)
Wishing you a lovely weekend and some peaceful knitting!
Taking stock of my WIPs (works in progress), that is. Taking stock of my life, or of life on earth, or of the crazy sauce that is politics these days, would take too long. And be rather depressing. Knitting is better.
I only have three projects in progress right now. I was going to say “on the needles” but one of them is in the finishing stage, so already off the needles.
TREIT
I finished knitting this little lace tee-shirt at least a month ago, I think. It is knitted with a lovely wool and linen blend yarn called Kalinka 21, in a gorgeous, sunny, grassy green.
I have only three things that have still to be done with this one. First, I need to graft the sleeve stitches at the underarms:
Second, I have a few ends to weave in:
And third, it needs a good blocking.
If that is all that remains to be done, why haven’t I done it? First, I hate grafting and insist that it can only be done in full morning light. I have been working on the weekends again, and the weather has been often cloudy and rainy, so there has been no opportunity to take advantage of clear, morning light. Second, I finished knitting it just as the summer ended and the autumn weather set in. What motivation do I have to finish a summery linen tee at the beginning of autumn? I can’t even use the winter holiday in sunny locale excuse, because well…Covid. I’m clearly stuck in England for the foreseeable future. Third, I am lazy. Enough said.
URSULA
In my last post, I talked about having swatched for a vest for Doug, using the Ursula pattern (Ravelry link) by Kate Davies. This is a women’s cardigan pattern but I am trying to be creative and transform it into a men’s waistcoat. It will be my first steeked garment, so I am imagining all sorts of anxiety to come as I take up the scissors to cut my knitting. But, for now, it is a rather straightforward project. Here is exactly two weeks worth of knitting progress:
Today, I had Doug try it on for the first time, and it fits. Whew! I am terribly slow at stranded knitting, however. At the moment it is taking me 18 minutes per row, which amounts to 3 hours per colour pattern. I am hoping to improve on my speed a bit, but the days of my super fast knitting have gone. This will clearly not be a quick knit. But see how pretty it is?
By the way, Treit is a Kate Davies pattern, too, so I seem to be on a bit of a Kate thing at the moment. I have also joined her latest club so I am currently waking up to a new design by her every Friday morning. Chances are this will result in another Kate project on the needles before long. (Anyone else enjoying the new club?)
KOKO
Remember this?
It is an ingenious three-dimensional knitting pattern designed by Olga Buraya-Kefelian, which I am knitting in three luscious shades of Northiam by Kettle Yarn Co. This is what it looks like unblocked, but rest assured, when it is blocked it will undergo a transformation and knock your socks off.
I have only knitted about 4inches/10cm since the last time I showed it on the blog, some months ago now, so this is clearly going to be one of those very-long-in-the-making shawl projects which I sometimes undertake. They take forever to knit because I can’t stay monogamous to them, but the end project is worth it (like this or this).
I am looking around for a new project to cast on, so that I have enough variety in my WIPs to keep me interested. What’s next? Well, Doug and I have been walking a lot and it is getting colder outside, so mittens and hats are appealing at the moment. How are your WIPs going? Does this autumn air make you want to cast on? (And for those in the Southern Hemisphere, soak up some sun for me. If I was there with you, I’d be wearing my Treit right now!)
In England we have four seasons; sometimes all in the same day. Today we have had a bit of everything – sun, clouds, wind, rain, even hail. It was a perfect day to nestle into the cozy warmth of my new cowl.
This is the Highland Rogue cowl, designed by Kate Davies, and knitted with Kate’s 100% wool sportweight yarn, Buachaille. I love this yarn (I used it to knit three pairs of mitts, which you can see here, here, and here). It is a lovely, plump yarn that takes beautifully to both colourwork and texture, and it feels great on the hand.
I have written a few posts about this cowl; it has been on my needles since September. The pattern is not an easy one to “read” on the needles; I had to pay attention to the pattern on every row. This is odd given that it is only a 6-row repeat. Nonetheless, I repeated the pattern in my head over and over again while knitting this. (Perhaps this has more to say about my attention span than the pattern?) While this meant it was not mindless knitting, you can see that the resulting texture is simply gorgeous:
I have used this lovely orange shade called Highland Coo. It is a cool orange, with no yellow tones, and a strong, rich hue that looks good in sun and shade.
I especially like the way it looks against the blues and bold patterns of my Sofi cardigan (which is blogged here). These photos were taken today in Henley-on-Thames, which was a riot of blues, purples, and greens, all of which set off this pop of orange. I work and shop in Henley, so I am here nearly every day, and I am still amazed at what a lovely town it is.
I highly recommend this pattern. If you can manage it, try to knit it with the Buachaille – you won’t regret it!
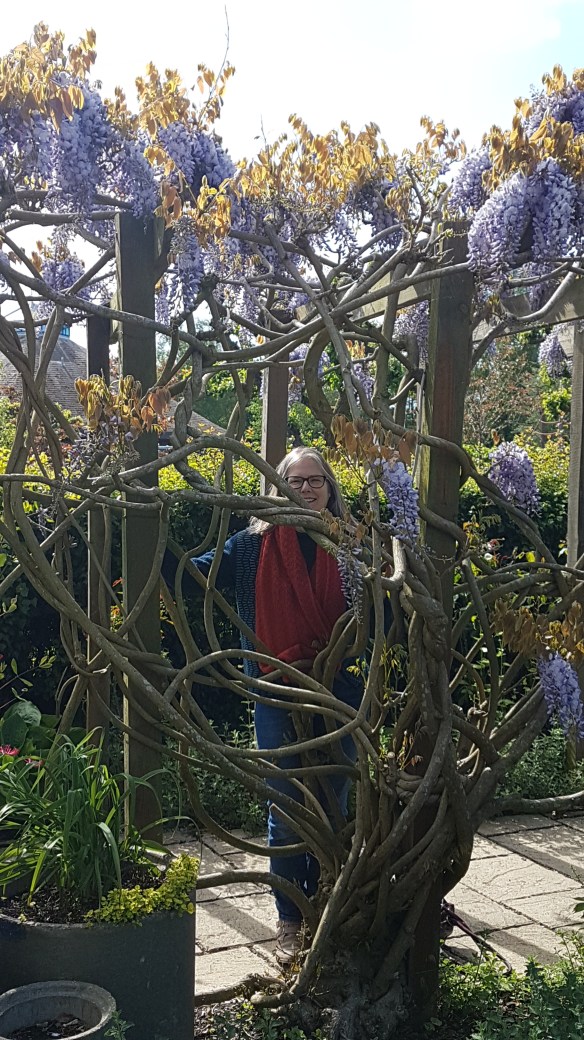
I finished knitting this a few weeks ago, but couldn’t get it photographed until today. I am glad I waited, as it has been picture perfect (despite the hail). The bluebells are out in England at the moment, as is the wisteria, and everything is bursting with colour.
It’s a long weekend here, and I’ve got something new on the needles. Good knitting, everyone!
We are in Vancouver for the holidays. On Christmas Eve, Doug always cooks a whole salmon. We are into tradition. Today we woke up early to go to Granville Island to buy a salmon at the market. The Granville Island markets are fabulous; if you haven’t been, you should put it on your wish list. They are also always crowded, a lovely, bustling, market full of happy people, fantastic food, and even more happy people. This morning, December 23rd, they were especially crowded. As I was pushing my way through a mass of people, I spotted something: a woman wearing a hand-knitted hat designed by Kate Davies.
I stopped and asked her “Is that a Kate Davies hat you are wearing?” “Yes,” she said, “And I am wearing a Kate Davies sweater as well.” This started a nice conversation with Julie, a fellow Kate Davies fan. She unzipped her coat to show me her sweater and politely didn’t call me weird when I asked to photograph her for the blog. Here is Julie, wearing her Bunnet (Stranded) hat from Buachaille: At Home in the Highlands, and her Keith Moon sweater from Yokes.
Julie pointed out that she had only put in one contrast colour in her Keith Moon, as she was using stash yarn. I think she looks fantastic and the colour and fit is perfect. Julie, like me, has joined Kate’s Inspired by Islay club, and is hoping to get Kate’s new book for Christmas this year. (I know its under my tree, because I ordered it and wrapped it up myself with a “For Kelly” tag.)
I am now back in England and we had a beautiful hour or two of sun this afternoon (!) in which to take some photos of my new mitts. These are the mitts which I was knitting last week while in South Africa communing with elephants.
This is the pattern Wedgewood Mitts, designed by me. I designed them to play around with a lovely shipment of Kate Davies’ new yarn, Buachaille. The original pair, made for Leah, was in a very pretty mid-blue with white edging. Just before leaving for Johannesburg, I tossed a skein of this lovely spring green, called Yaffle, and the remaining white from the first pair of mitts, into my suitcase.
I made a few small modifications from my original pattern. Here is what I did:
Cast on an extra 4 stitches (48)
Worked an extra two rows of corrugated ribbing
Decreased 4 stitches after ribbing
Worked an extra 2 rows before starting gusset
Worked three rows less before adding white edging
Basically, this added 4 stitches just to the cuff, to make the cuff a tiny bit more roomy. I also made the cuff portion of the mitt slightly longer, while making the finger portion of the mitt slightly shorter.
I am very happy with how they worked out, and am especially charmed with the combination of this spring green and the white (Yaffle and Ptarmigan in Buachaille-speak). Obviously, I am not the only one to think so. I had finished the first mitt and cast on for the second when I noticed that Kate Davies had designed a new hat for release at the Edinburgh Yarn Festival this weekend:
I absolutely love this design, which was inspired by a collection of Hornsea pottery designed by John Clappison in the 1960s; go read Kate’s post here. Sadly, I cannot be at the festivities in Edinburgh this weekend, but I did try to alleviate my misery by ordering a kit to make this hat! Just think how pretty it will look with the mitts.