Those who know me will tell you that I rarely knit for babies. Even when my own girls were little, they rarely benefited from the fruits of my knitting needles. In the nearly five years that I have been writing this blog, I haven’t knit a baby sweater. Until now.
I have some friends who have just had their first baby. These friends are special, and thus obviously so is the babe. Clearly he deserved a bit of stylish hand-knitting intervention. I perused baby patterns for quite some time. With Doug’s help, I finally decided on the pattern called gramps, designed by Alexa Ludeman and Emily Wessel, the duo otherwise known as Tin Can Knits. Here is their delightful version:
I made a trip into London to my favorite yarn store, Loop, in Islington (which also necessitates buying cakes at Ottolenghi – poor me! how I suffer for my knitting!). I spent a very long time trying to choose the perfect colours of Madelinetosh Vintage, which we all know is a very luxurious hand-dyed worsted weight wool. I purchased two beautiful skeins: Turquoise, which to my eye is more a forest-y green/blue than an ocean-y green/blue (to use sophisticated colour terminology) and Pecan Hull, which is a lovely but difficult to photograph brown.
I bought the yarn without purchasing the pattern first (or even looking at the yardage stats on Ravelry). I bought one skein of each colour – after all, this is a sweater for a baby; how much yarn could you possible need? Imagine my consternation to discover that in the 6-12 month size, this little sweater eats up 260 yards of the Main Colour and 140 yards of the Contrast Colour. A skein of Madelinetosh Vintage is 200 yards. Whoops! (Even in the newborn size, I would have needed 240 yards of the Main Colour.)
Luckily, we knitters have a solution to problems like this: it is called MATH!!!! Yes, dear readers, I engaged in a bit of “Pattern Math Fu” to re-design the sweater. Note that the original pattern calls for a total of 400 yards of yarn. Note further that I had 400 yards of yarn. All I had to do was change the pattern sufficiently so that it had a more equal distribution of the colours. This, I must admit, was rather fun, and I think the end product is completely lovely in every way.
I followed all of the instructions for the 6-12 month size exactly, except that I omitted the pockets and elbow pads, and added in seven sets of 2-row stripes on the body and sleeves of the sweater. Here you can see the yarn that remains:
I had so much fun knitting this little sweater. We actually had a week of decent summery weather (egads!) and I enjoyed the chance to knit in the back garden while listening to a good book.
Photos don’t do this sweater justice. It is absolutely fabulous. It is the perfect sweater for the urbane hipster baby to wear while sitting at his favorite coffee shop charming all the passersby.
This pattern also comes in adult sizes. Resistance is futile.
I have a lovely new knitting pattern book. It is a Norwegian pattern book (a pamphlet really, but book is easier to write) from Rauma, one of Norway’s big yarn producers. The tale of how I acquired it is rather interesting, and I thought it would make good Saturday- morning-over-coffee reading. One of the things which I read most Saturday mornings with my coffee is Karen Templar’s Elsewhere post. If you aren’t reading Karen’s gorgeous blog, Fringe Association, you are missing something (her blog is very popular so it is unlikely that anyone reading my far more humble blog will not have heard of Karen). One of my favorite features of her blog is Elsewhere, published on Fridays, in which she provides links to content she finds interesting – these come from a range of sources, including articles, blog posts, and various gorgeous or inspirational textile-related things she finds on-line and shares. In mid-April, I read this Elsewhere post. One of the links took me to a blog post by Paper Tiger.
The Paper Tiger blog is written by Dianna Walla. She is one of my ‘friends’ on Ravelry and I have been interested in her stuff for awhile now. I find Dianna intriguing for a number of reasons: (1) she is a Linguist (I consider myself a “lapsed linguist” at this point, but you might say it’s in my blood), (2) she is a fabulous knitter, (3) she is a fairly new designer but her stuff is really good, (4) she now lives and studies in Tromsø, Norway, somewhere I have long wanted to visit, and (5) she can really write. The particular post which Karen linked to, which you can find here, is about the Norwegian wool, Rauma Garn. Rauma is an old company, and has a huge back-catalogue of patterns. Dianna notes that the company has been publishing some knitting pattern booklets with re-issues of old patterns that have been re-worked for modern tastes. The photos of these sweaters are mouth-watering (make sure you read Dianna’s post)! I was particularly taken with this photo:
I saw that photo, and thought “Hmm, I’d like to get my hands on this pattern booklet.” And, without further ado, I popped off an email to my friend Erun. Erun lives in Copenhagen, but she is Norwegian, and I know that she has a mother who knits. I sent a link to the pattern booklet and asked if it was possible to purchase it in Norway.
This was all done while sitting and reading on a Saturday morning in my house in Oxfordshire, England, and was soon forgotten. A month later, I made a business trip to Malaysia, where I was teaching at the business school. I knew that Erun’s job often took her to Malaysia, and I sent out an email to ask if she would be there. In a lovely and serendipitous fashion, she was also in Malaysia and we both had a weekend free. We agreed to meet up in Singapore for two days of sight-seeing and catching up. I made a brief post about this weekend trip, which you can find here. Here is a photo of the gorgeous Erun and me sitting on the deck at the Singapore National Gallery. I love this photo because you can see reflected in the window behind us the view of the harbour which we were facing. (By the way, the Singapore National Gallery is fantastic in every way – gorgeous exhibits, gorgeous architecture – and this deck may be the best place to sit in Singapore and enjoy a drink on a hot afternoon; but don’t order the iced coffee! It ranked extremely low on my coffee-o-meter scale.)
Imagine my surprise on this trip when Erun said, “Oh, my mother bought you that knitting book and I brought it with me! Here it is!”
And here I am, back in England, with my new knitting pattern booklet!
This booklet has some amazing patterns in it; I am especially impressed with the menswear. Here is the only other photo I seem to be able to download, but there are a number of men’s sweaters that are really fantastic. I will try to get photos of them at a later date.
Now I plan to enjoy this new pattern book, not only for the beautiful designs, but also for the opportunity to try to read Norwegian knitting patterns!
This pattern book had an interesting journey to my hand. From a blog written by an American student in Norway, to a blog written in Tennessee, to my cozy morning reading in England, to an email posted off to a friend in Copenhagen, to a request to her mother in Norway, to a weekend in Singapore, and finally back home to Oxfordshire! Many thanks go to Erun’s lovely mother!
I have just returned from a quick trip to South Africa, where I was teaching in Johannesburg. As always, I put considerable thought into which knitting project(s) to take with me; unfortunately on this trip I was too busy to get much done. (I also didn’t knit on the plane, despite having my knitting with me!) I always put a lot of effort into my teaching and it left me tired out at the end of the day.
I did, however, work on the button bands of the lovely spring cardigan I am making for Leah (see here for more details). And thus begins a tale of button band blues. Warning: Those of you who have no interest in the technicalities of knitting and only read this for the pretty photos, you may wish to stop reading right now before your eyes glaze over. For the rest of you, you may recall that the cardigan (designed by Amy Herzog) has a very pretty textured panel on the waistband and cuffs. You can see the edging in the below photo:
This pattern is made with an 8-row repeat. There are twisted stitches on rows 1 and 5. The instructions for the button band say to pick up and knit stitches along the front edge and then to knit in pattern beginning with Row 2. I thought about this awhile: why would she begin with Row 2? I decided that this was because Row 1 involved twisting every other pair of stitches. Perhaps, I speculated, twisting stitches on the first row would draw in the fabric along the edge of the button band and result in an uneven and non-stretchy edge. That makes sense, no? So, I duly picked up the requisite amount of stitches and started knitting the button band. After a few rows, I actually paid attention to what I was doing and realized that I was knitting it backwards: the pattern right-side rows were being knit on the wrong side of the garment.
I realized that this was due to the way that I pick up stitches. The pattern asks that you hold the garment with the right side facing you, and then, starting at the right edge, pick up and knit across to the left edge. (This is a fairly standard instruction.) This means that the very next row will be on the wrong side of the fabric. With this 8-row repeat, Rows 1, 3, 5, and 7 are on the right side (RS) and Rows 2, 4, 6, and 8 on the wrong side (WS). Since the first row to be knitted after the pick-up row is on the wrong side, Herzog starts the pattern with Row 2. This makes perfect sense if that is how you pick up stitches. However, this is not how I pick up stitches.
I am not sure how I learned to pick up stitches along an edge. Perhaps my grandmother or mother taught me, perhaps I taught myself using trial and error and intuition. However, although I mostly knit in a right-handed fashion, despite being left-handed, I absolutely cannot pick up stitches with my right hand. Furthermore, I have never executed a “pick up and knit”, but rather just “pick up” stitches. I do this by holding the right side of the fabric facing me, and start from the left-hand edge. I wrap the yarn around my right index finger, and then simply insert the tip of the needle into the fabric, pick up the yarn, and bring it through. I have made a little video to show you what I do:
I have always picked up stitches this way. I don’t know whether others do it like this or not. It works for me. Once I realized that this is not the standard method, I tried really hard to pick up and knit with my right hand moving across the edge from right to left. I failed miserably, and really my method works well for me; why should I quit? There is a problem with this, however – the very next row after picking up the stitches is on the right side of the fabric, not the wrong side.
So, I ripped out the button band, and decided to start with Row 1 since I was starting on the right side of the fabric. But now, I thought, there was a potential problem – Row 1 has twisted stitches. You see, I had convinced myself that Herzog started with Row 2 in order to avoid having twisted stitches all the way across the first row of the button band. Even though I now realized that she started on Row 2 because in fact she needed to start with a WS row, I didn’t re-think this misconception. As a result, I started the button band again with a Row 1, but without twisting the stitches (thus with a K2P2). This really didn’t look right to me. But I convinced myself that starting with twisted stitches would be wrong so I kept going, while slowing down more and more as I stopped to frown at the button band frequently. This is what it looked like:
I tried very hard to convince myself that no one would notice this on a button band. However, my perfectionist came to the fore and I couldn’t bear it, so I ripped it out (again!) and started over with a proper Row 1, including the twists. The result is very subtle, but, to me at least, made a big difference in the feel of the piece. Here is a close-up without the twists:
and here is the corrected band with the twists:
Much happier now, I continued to knit the button band. I did this while watching an amazing tennis match being played at Wimbledon (on the telly, of course). This was the finals of the Men’s Wheelchair Doubles, in which Gordon Reid and Alfie Hewett eventually managed to win the title against Stephane Houdet and Nicolas Peifer. It was a beautiful tennis match, in which all four players displayed incredible athleticism. It was both lovely to watch and a nail-biter as both pairs were in contention throughout. At the end of the match, I looked down and discovered that on Row 5 (quite a few rows down at this point) I had twisted all of the stitches the wrong way. So, once again, I had to rip.
The button-hole band started out much better. I had to do some math-fu to get the button holes evenly spaced, and had to pay quite a bit of attention on the buttonholes themselves (Herzog uses Barbara Walker’s one-row button hole method, which has always been my favorite, even if it is quite fiddly). I finished the band, and cast it off, and only then realized that half way through the band, I had twisted all of the stitches on the fist half of a twist row and not twisted them on the second half! Rip! Groan! Clearly a glass of wine is in order! And a good book! Or maybe a lobotomy!
I am now happy to say that the button bands are done. I managed to knit the back, both fronts and both sleeves of this cardigan without ever tripping up on the edging. Why now when the end is in sight? This is definitely a case of button band blues.
It has been a long time since I last wrote a Wearability Wednesday post. For those of you who are new to the blog, this is a post in which I re-visit a hand-knitted garment and look at it from a wearability standpoint. Does it get worn? If yes, how do I style it? Has the garment held up to time?
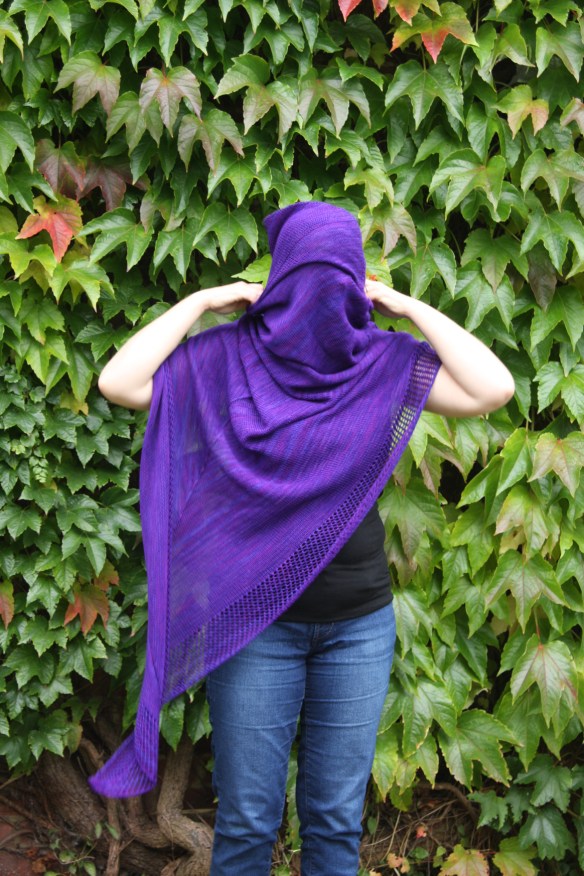
In this Wearability Wednesday post, I look at my Viajante, a sort of cross between a shawl, a cowl, and a poncho, designed by Martina Behm. Here is me wearing it, just after finishing it, in 2013:
It is a laceweight shawl, made with one skein of Wollmeise Lacegarn. I knit it over a period of 5 months, which doesn’t seem so long now, but at the time I remember feeling it was endless. The above photo is from my blog post about the finished garment, which you can find here. In that post, I comment that it is actually not an easy garment to wear:
I am extremely proud of this shawl, it is a beautiful piece of knitting, made with fabulous yarn, and it makes for a striking garment. However, I wore it exactly three times. I never received a single comment on it. Not one. I came to the conclusion that it looked silly on me. (I think in the top photo of me it looks as if I have one arm and giant boobs and am wearing a voluminous purple cape. Maybe like a costume shoot for a new Wonder Woman movie? Showing off the purple Kevlar-like battle garments worn by her backup crew of middle-aged, ex-Amazonian battle advisors?) Perhaps, more accurately, I decided that I obviously didn’t have the necessary panache to carry off this piece. So what did I do? I gave it to Emma, of course!
Emma is tall and slim and extremely stylish and could carry off anything from haute couture to a potato sack. If you put her and Wonder Woman in a photo shoot, no one would spare a glance for Wonder Woman. Emma apparently wears this Viajante frequently, and enjoys it. She brought it with her to Sicily in May, and I couldn’t resist taking some photos of her wearing it. Viajante means traveller, and this knitted piece was started in Lebanon, finished in England, given to Emma who lives in Vancouver, and modelled in Sicily; traveller indeed!
These photos are taken in the gorgeous villa we stayed in (see this post and this one for more details on Sicily and the villa). You can see that Emma has styled it in a more casual way, and has bunched up the material more around her neck, making it have less of a fall. On her, it looks cute and pretty and natural. She switched to a pair of heels in the evening and she wore it to cocktails and dinner, and looked elegant.
This is not the first time I have solved a wearability issue by giving away a garment to my daughters. In this previous post (which I must say is a very good post), I showcased a hand-knitted dress which I made for myself but gave to Leah, and it ended up suiting her far better. Luckily, I have two daughters who love my handiwork and wear these garments with pride. It means that if I make a stylistic error, I can always remedy it through the ‘daughter route’ (and earn mom points as well)!