Do you ever wonder what to do with little odds and ends of homespun yarn?
In the fall of 2016, Doug and I spent a few days in Wales (blogged about here) and included a stop at The Lost Sheep Company in Colwyn Bay. There, in addition to chatting with its charismatic owner, Chrissy, and wading through waist high bundles of fleeces:
We purchased four tiny skeins of homespun yarn from Welsh bred sheep. In the below photo, the yarn on the left was un-labelled, followed left-to-right by Jacob, Welsh Mule, and Black Welsh Mountain.
I had differing yardage of each yarn, and they were of different yarn weights. I wondered for a long time what to do with them, and one night shortly after the New Year, I just picked up the first skein and started to knit. I didn’t do any gauge swatches or fuss with measurements. I didn’t do any math. I cast on 180 stitches with a size US 11 needle and started to knit in 2×2 ribbing. When I got to the end of one skein, I added another, and kept knitting until my yarn ran out.
As Doug was the one who picked out the yarn, I made the cowl for him. I think it suits him well.
It is amazingly plush and cozy, and has a fantastic hand. With the exception of the small nups of colour in the un-labelled batch, it is all un-dyed. I hadn’t knit with handspun in some time, and really loved having it on my needles.
Emma was still here when I finished, and she had just finished knitting her own cowl (blogged here), so I tried to get a photo of the two of them. Do you have any idea how hard it is to get Doug and Emma to cooperate and not be silly?
Photo attempt #7:
Photo attempt #13:
Photo attempt #312:
Photo attempt #2,397:
This is, of course a slight exaggeration, but they delight in being silly, especially when I am trying to get a photo for the blog.
If you are trying to find a use for small bits of homespun yarn, I recommend this fun and easy solution.
For Christmas, I gave Emma a get-back-to-knitting kit. Emma is a fantastic knitter, but suffers from lack of follow-through; her attention gets distracted by all of the other things she does well. I had hoped that she might be tempted by having yarn and needles at hand. My ploy seems to have worked:
I purposely picked a project that could be finished quickly; Emma knitted it in a few days. It is called the Cecilia Cowl. The gift consisted of a photocopy of the pattern (it is a free pattern designed by Rachel Atkinson for Loop, which you can find here), a skein of Freia Super Bulky Ombre in the colour Nautilus, and a US size 17 circular knitting needle. I had thought that I would be around to give a hand if needed, but Emma knit the whole thing on her own, mostly during the wee hours (she arrived Christmas Eve so was very jet-lagged).
This is a great project for beginners – the pattern is easy but is also engaging enough to keep your interest. Best of all, the constantly changing hues of the yarn make it hard to put the project down: it is a “just one more row” kind of project.
Emma is flying back to Canada tomorrow, but I am hoping that her interest has been snagged enough for her to take advantage of all of the great knitting shops in Vancouver. I am a great enabler, am I not?
I hope that you have all had a lovely holiday, and enjoyed some relaxing knitting time.
Given that it is Boxing Day, and I am about to show you a finished project, one might reasonably assume that this project was a Christmas gift. But you would assume wrong! Leah’s birthday falls the week before Christmas, and I knit her a SnowFlower for her birthday.
SnowFlower is a pattern by Heidi Kirrmaier, which is a yoked design using worsted weight wool. One of the interesting features of the design is that the sweater is cast on just above the armholes at the beginning of the yoke, and knit up. Afterwards the provisionary stitches are picked up and the body and sleeves are knit down. This seemed like an interesting technique, and in this case, it worked out great: the yoke was shaped with decreases instead of increases (which I think have a better look to them) but the lengths could still be determined at the end by trying on the sweater.
I knit it in De Rerum Natura Gilliatt, a worsted weight 100% merino wool from France. It is a very lofty yarn with 250 metres per 100 gram ball. The yarn is very reasonably priced, and with this excellent yardage, it comes in at just over half the price, metre for metre, of Brooklyn Tweed. (Note that I live in the UK, where it is likely that Brooklyn Tweed is more expensive and De Rerum less expensive than in the US.) I found it to be a very nice yarn to work with and produces a great, soft, lofty fabric.
I am very happy to put it on my list of great workhouse yarns, as it is nice to sometimes knit things with reasonably priced yarns. The only complaint I have so far of the yarn is that the colour palette is limited. I would have loved to have a bit more choice.
There are many great examples of this sweater on Ravelry. I was particularly inspired by two beautiful examples knit by SmashingPuffin. I am glad that I followed through because it was a delight to make, and very quick.
I wrote a few blog posts about trying to pick the right colour combination for this sweater. I really think I nailed it in the end. I am totally pleased with these colours. I think that it looks very Norwegian. The combination of the cheerful snow flowers of the pattern and the lively pop of red, make for a beautiful winter sweater. It is both warm and cozy, and sunny and bright.
I knit the sweater exactly according to the pattern. The only change I made was to add an additional 4 stitches under each sleeve (picking up 18 instead of 14 stitches). The knitting took no time; I finished in about 5 weeks. I managed to finish it in time for Leah’s birthday, but then she decided she wanted it an inch longer, so I ripped out all of the ribbing on the body and the sleeves, knit an extra inch of stockinette and then re-knitted the 3″ of ribbing.
Doug said “Why didn’t you just make the ribbing 4″ long? That way you wouldn’t have had to rip and re-knit all of that rib.” The truth is it never would have occurred to me to do that. One of the things I like about a hand-knitted sweater is that you knit it so that it is exactly right. If you wanted a sweater that wasn’t exactly right, you could buy it. Ripping and re-knitting, so that your garment turns out exactly how you want it to, is one of the joys of knitting. Call me crazy, but that’s how I feel!
We photographed this sweater today, on a fairly grey, wet Boxing Day in the beautiful village of Turville, which is frequently used as a film site. Can you see the windmill up in the top of this photo? It is the Cobstone Windmill located in the adjoining village of Ibsden, and which was used in Chitty Chitty Bang Bang. (It was the home of inventor Caractacus Potts.)
This photo shoot was a family affair (just like old times!). Emma is home and so she took the photos for this post. Here is a shot I took of her doing the photo shoot:
We took some silly shots:
And here is a picture of me, pushed to the sidelines by Doug, Emma, and Leah (in a bid to keep me from micro-managing the process).
As a knitter it is very important to take care of your equipment. And what piece of equipment could be more important than your hands? As someone who has a history of hand and wrist problems, including repetitive stress injuries, I am always trying to be cognizant of maintaining good practices for hand health. I think that it is better for your hands to be alternating between different kinds of knitting, and in particular between different weights of yarn and needles. In that vein, I decided to cast on something using a thick yarn.
I tend to prefer knitting with lighter weights, but I had bought this yarn last fall with the intention of making a quick Christmas gift, and then never got around to it. It is incredibly soft and is in a very vibrant and saturated purple. I love how the chunky yarn in a heavily cabled fabric makes such great texture – it results in beautiful hills and valleys bursting with light and shadow.
The yarn is Whitfell Chunky by Eden Cottage Yarns, a 100% baby alpaca in the colourway Damson. The pattern is the Umbra cowl designed by Louise Zass-Bangham. I tried this cowl on at a wool fair last year, made with this yarn, and it was wonderfully cozy; I bought some on the spot.
Do you know the other advantage of knitting with chunky yarn? It takes no time to finish something!
This cowl took a few short evenings of knitting. The pattern is intuitive and doesn’t require much attention. It is good TV knitting, or carrying-on-a-conversation knitting. The only difficult part was grafting it together. Here I will let you in on a secret: I suck at Kitchener stitch! Really, this is on my list of knitting techniques that need major work. I inevitably end up with more stitches on one needle that the other. (Many more than the one stitch you would expect.) If I stop concentrating for even a second, something goes wrong. Here you can see how lousy I am at Kitchener; look at this terrible join:
Oh my! Quelle horreur! Am I going to let my knitting perfectionism take control and force me to rip it out and re-graft, and then re-rip it out and re-re-graft, and then re-re-re-rip it out, etc. etc? No, I’m not. It’s staying this way! A New Kelly is evolving!
Having had a week in the thick of it (knitting-wise and otherwise in fact), I will return to my colourwork fingering-weight jacket with happier hands. I hope you are safe and dry this weekend.
This is my 300th post on this blog! I am very excited to still be writing the blog, and happy that people keep reading it.
To celebrate my 300th post, I designed and knit a beautiful, colourful shawl and have posted the pattern here for you.
I had three goals in mind with this pattern:
It had to be in garter stitch. (Mindless knitting, yeah!)
It had to use yarn already in my stash. (Limited funds, boo!)
It had to match my COOL BOOTS! (Cool boots, yeah!)
(The boots are from Camper.)
Here is a photo of it laid flat:
I love this shawl. It is a deceptively simple pattern, composed of long, thin triangles, but once it’s off the needles it has fabulous drape and the colour pops!
Please enjoy the pattern.
Cool Boots: a shawl pattern by Kelly Sloan
The shawl is knit lengthwise in garter stitch, with six very long triangles formed with short rows. Please read the pattern through before knitting, particularly the Notes at the end. You should review the instructions for German short rows in garter stitch (which you can find in this post on the blog).
Size: Approximately 18” x 70”
Yarn: Fingering weight wool in three colours; approximately 70 grams (350 meters/383 yards) of each colour. For this shawl I used Tvinni Tweed by Isager in shades 17S, 28S, and 32S. These are 100% wool tweed yarns in shades of red, coral and fuchsia, with a grey tweed undertone.
Needles: US 4 (for the shawl); US 6 (for casting on and binding off)
Gauge: 24 stitches and 48 rows (24 garter ridges); very lightly blocked.
When I took the shawl off the needles, it measured 16.5″ x 64″. I very lightly wet blocked it to 18″ x 70″.
Directions.
With Colour A and US 6 needles, cast on 380 stitches.
Switch to US 4 needles.
Triangle 1:
Row 1 (RS) – knit 2 rows. (You will have one garter ridge on RS of work).
Row 3 (RS) – knit to 12 stitches from end, turn work.
Row 4 (WS) and each remaining (WS) row – slip first st as if to purl, pull yarn to the back, knit across all remaining stitches (you have thus performed a German short row; see Notes).
Row 5 and RS rows: Knit until 12 stitches from the last German short row (indicated by the “double stitch”), turn work.
Continue until 18 stitches remain before the last German short row. (This number could vary depending on how you count your short rows. Continue until you have between 12 and 24 stitches before last short row.)
Next row (RS) – knit all the way across, knitting each ‘double stitch’ together as one stitch. (See Notes for German short row.)
Next row (WS) – knit all stitches
You should now have two garter ridges at the narrowest edge of the triangle with the right side facing you. At the wide edge, you should have 32 garter ridges (note that this number is not important, but it should be the same for each triangle.)
Triangle 2:
Change to Colour B. Knit 3 rows, ending with a RS row. You should have one garter ridge with Colour B with the right side facing.
Row 4 (WS) – Knit to 12 stitches from end, turn work.
Row 5 (RS) and each remaining (RS) row – slip first st as if to purl, pull yarn to the back, knit across all remaining stitches (you have thus performed a German short row; see Notes)
Row 6 and WS rows: Knit until 12 stitches from the last German short row (indicated by the “double stitch”), turn work.
Continue until 18 stitches remain before last short row (or same number of stitches as for last triangle).
Next row (WS): knit across all stitches, knitting each ‘double stitch’ together as one stitch.
You should now have two garter ridges at the narrowest part of triangle 2, when viewed from the right side.
Repeat these instructions twice more, thus making a total of 6 triangles, changing colours as indicated in the chart.
With RS facing, and using a US6 needle, cast off all stitches.
Finishing: Weave in ends. Wash and block lightly.
Notes
Note 1. Weigh your yarn. At the end of the first triangle, weigh remaining yarn of Colour A. You will need enough yarn for two triangles in each of the three shades.
Note 2. In the beginning, mark the right side (RS) of work with a removable stitch marker.
Note 3. All colour changes are made at the beginning of a RS row.
Note 4. The narrow edge of each triangle has two garter ridges. The first of these is made before you begin the short rows; the second garter ridge is made at the end of the triangle, after the short rows, when you knit across all of the stitches.
Note 5. On the first, third and fifth triangle, the short rows are made (the work is turned before the end of the row) on the RS rows; on the second, fourth, and sixth triangles, the short rows are made on the WS rows.
Note 6. There is a photo tutorial of how to do German Short Rows in garter stitch on my blog. You can find it in this post. This is by far the easiest way to make short rows in garter stitch, and should not leave any holes in your work.
Note 7. Put a removable stitch marker into the ‘double stitch’ formed by the German short row. After each short row, you can move the marker, so it always marks the last short row knitted. This makes it easier to know when to turn on the next turn row.
Note 8. When counting the 12 stitches between short rows, I counted the ‘double stitch’ from the previous short row as stitch number 1. This is illustrated here:
Note 9. You can make the shawl shorter or longer by casting on fewer or more stitches, respectively. You can change the width of the shawl by increasing or decreasing the number of stitches between each short row (the more stitches between short rows the “narrower” the triangle will be).
That seems like a lot of Notes, but the pattern is very intuitive and easy peasy. Please enjoy!
This shawl has not been test knitted. If you find any mistakes, or have trouble understanding any part of it, please let me know. You can leave a question on the blog, or you can write to me on Ravelry (my Rav name is kellydawn).
A final note: Please respect my copyright. Do not reproduce or publish any part of this pattern without my permission.
Some time ago, I bought myself a single skein of Shibui Knits Silk Cloud, a mohair and silk blend lace-weight yarn in the brilliant shade called Tango.
I am a big fan of Rowan’s Kidsilk Haze and have knit many things with it. But I was curious about the Silk Cloud. The Silk Cloud is more expensive. However, it has a higher silk content – 40% in the Silk Cloud compared to 30% for Kidsilk Haze. Most important to me, the colours of the Silk Cloud are glorious – brilliant, richly saturated tones. Kidsilk changes its colours frequently and the last time I checked I found their palette to be rather pale and uninspiring.
I decided to knit a little cowl using a free pattern available on Ravelry called the Madita Cowl, designed by spacecurry.
This was an airplane knitting project, knit entirely while in the air (or the airport lounge). I used plastic needles (so as not to upset security), and the whole project was so small and lightweight that it fit easily into a pocket. I actually did not enjoy knitting it, although not for the reasons you might suspect. The yarn is lovely, as is the pattern; the truth is that I hate knitting with laceweight yarn on big needles (a US9). I complained about this on these pages before, when knitting the beautiful Smoulder sweater for Emma, which uses a double strand of Kidsilk Haze but it is knit in part with size 15 needles. I think perhaps continental knitters might find this easier, but as a thrower, I find it very awkward.
The cowl itself is gorgeous, although a bit of an enigma. You see, it is too short to wrap around the neck twice, and too long to provide any actual warmth to the neck. This makes it essentially a bit of frippery (although a pretty one at that). I believe that if I were to knit it again, I would make it longer, so that it could be wrapped twice.
Now that I have had my little experiment, I can say that there will be more Silk Cloud in my future. The only difficult task will be not buying one of every shade.
I wanted to do a quick project this week. I rooted around in my yarn stash and found a bag full of half-used balls and remnants of Rowan Fine Tweed. I really like this yarn and used it to knit my Peerie Flooers hat and my Soumak Wrap, both very colourful projects, meaning lots of bits of many colours leftover. Rowan has now discontinued this yarn, carrying on its great tradition of discontinuing nearly every yarn I love (knock on wood for Kidsilk Haze).
I had in mind a quick pair of mitts based on Follow your Dreams, a very cute pattern available for free on Ravelry by Vlněné sestry. Here is the pattern photo:
I spent some happy time playing with all of the leftover colours when it came to me: I could knit a rainbow!
I used a light grey for the background and picked out five rainbow shades for the arrow motifs. I didn’t think I had enough of the grey, so I knit the ribbing around the wrists in rainbow stripes as well. The colours are reversed, so the wrist ribbing uses red, orange, yellow, green and blue, and then the arrow motifs work in reverse order from blue to red. Thus, the mitts are framed by the red. At the time, I had no inkling that the red would match my beloved Acer cardigan so well, but I think that together they are fabulous!
The only other modification I made was to make the mitts mirror images of each other (so that the arrows point in opposite directions). I loved making this project. I could easily imagine knitting up many pairs of these, using lots of different colour schemes. It is a great project for using up small bits of fingering weight yarn. Using stripes for the ribbing meant many extra threads to weave in at the end, but it was totally worth it.
Some time ago, I wrote a post about the use of gussets in mitts and mittens. In that post, I mentioned that I had always knit mitts with gussets, and I speculated that gusset-less mitts would be uncomfortable to wear. Based on my lengthy observation consisting of wearing this one pair of mitts for a few hours (how scientific!) I would venture to say that gusset-less mitts can indeed be comfortable. I will now have to do more research on the topic, thus necessitating knitting more mitts. All in the name of science of course!
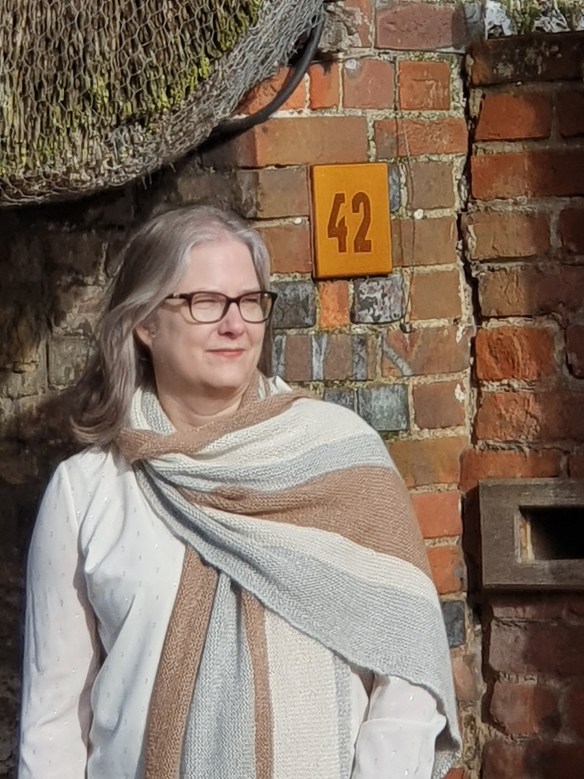
We took these photos this morning in Henley-on-Thames, a beautiful old market town on the Thames a few miles from my home. (I work there and shop there.) The sun was shining and everyone was smiling; it was a perfect day to walk along the river and to wear my new cardi and rainbow mitts.
I wish you all sunshine and rainbows this weekend!
I’m very happy to have finished my Acer Cardigan while it is still cold enough to wear it. The above photo was taken last weekend in Copenhagen. It is such a gorgeous city, but can be very windy. A squishy, warm cardigan definitely comes in handy.
Amy Christoffers designed the Acer Cardigan in 2010 and nearly 900 projects are documented on Ravelry. When you get that many knitters using a pattern, you know in advance that the pattern will be good and won’t need any “fiddling”. I followed the pattern exactly; the only modifications I made were to knit it one inch longer (and use two extra buttons), and also to cast on more stitches for the edgings (see below for details).
I used Berroco Ultra Alpaca, a worsted weight yarn that is a 50/50 wool and alpaca blend. It is a very sturdy yarn and has good definition; this latter is very important for this pattern which combines cables with lace. I am still not sure what I think of the yarn. It comes in lovely, rich colours, works cables beautifully, and comes in at the inexpensive end of my yarn buying spectrum. On the other hand, it is a bit itchy and I am worried that the alpaca might become “fuzzy” with use. I will need to wear it and wash it a few times before I can pass judgement. Here you can see the great stitch definition:
I knit this in a size 42 and find the fit to be spot-on, with about one inch of positive ease. The shoulders fit really well, although I find the sleeves to be a bit tight. I like the fact that I can button it with no gapping. I used a US 6 needle and US5 for the button bands and neck ribbing.
I found only two problems with the pattern, fairly minor ones, but useful to know about in advance. Although Amy lists two needle sizes at the top of the pattern, noting that the smaller size is for “edging”, she doesn’t actually note within the pattern itself to switch to the smaller needle when knitting the button band and neck edgings. This is a VERY niggling point, but I see on Ravelry that many knitters didn’t switch and wish they had. The other problem is actually a small error in the pattern; she has you pick up stitches along the neck by a factor of four, but you actually need a factor of four plus two, so that the ribbing will both begin and end with two knit stitches. I picked up more stitches than the pattern called for: in my size, she suggests picking up 83 stitches for the button bands and I picked up 103 (though recall that I added an inch to the sweater length), and for the neck I picked up 118 instead of 108.
Here is a photo in front of the Copenhagen Contemporary Art Gallery. I am standing in front of the exhibition Wish Tree Garden by Yoko Ono. (If you are by chance in Copenhagen during the next two weeks, I loved this exhibit, which will close on the 5th of March.) Thanks to Erun for taking the Copenhagen photos.
I love the buttons I picked. I had planned to use a pair of plain wooden buttons, but saw these and instantly thought they’d be perfect. (I bought them at Loop in London.) I think they add just a bit of flash to the cardigan.
This was the second worsted weight cardigan I’ve knit in a row (the first was the Tinder cardigan I knit for Emma). Unlike Tinder, this cardi flew off the needles; it took me 6 weeks to the day to knit, even including washing and blocking and sewing on buttons. This made me think “I need to knit more worsted weight sweaters”, but now that I have been wearing it, I must say that it is VERY warm. I think that my next few sweaters will use a fingering or sport weight wool.
It is a dreary day here in England. I must admit to loving dreary Saturdays – no feeling guilty for knitting all day! Happy weekend!
I’ve written a lot of posts about the Tinder Cardigan that I have been knitting for Emma. Some of them funny, some of them frustrated, and many of them nit-picky. But, I have to say, this cardigan is really worth the effort.
I will leave you to read through my earlier posts for in-depth details. The cardigan was designed by the great Jared Flood for Brooklyn Tweed (the Ravelry link is here). I used Shelter worsted weight yarn (also from Brooklyn Tweed) in the shade Birdbook. Despite the fact that it is not my favorite yarn to knit with (I don’t like the feel of it in my hands), once washed and blocked it really delivered! It is so light and lofty and has one of the best tweed palettes anywhere.
I knit it in a size 34 planning on an inch or two of ease; my gauge swatch lied a bit (that’s my story and I’m sticking to it) and it ended up being REALLY narrow. I blocked it out twice in order to get more width, particularly in the collar and biceps. It ended up with zero ease – not the look we were going for – but both Emma and I agreed that it looked fantastic this way.
I made very few modifications. I knit it two inches longer than called for – both in body length and sleeve length. I knit the ribbing for 6 inches (instead of the 4.5″ called for). I put in more buttons (9 instead of 7), and they were also slightly larger than the pattern called for (1″ as opposed to 3/4″). I found a beautiful ribbon which has a pattern in the very same shade of green, and I painstakingly sewed it over the pick-up seams on both the button and the button hole band. My hope is that the ribbon will give the cardigan some stability over time and keep it from stretching out of shape.
I took the unfinished cardigan with me to Vancouver, where we were spending the holiday with our daughters. While there, I knit the button bands, picked out buttons with Emma (at the funky shop Button Button), sewed on the buttons, and then, as said before (but it demands repeating) painstakingly sewed on the ribbon.
On New Year’s Day, we drove up the coast, first to Horseshoe Bay and then farther up towards Whistler. The day was stunning with blue skies and fabulous scenery, but it was icy cold and extremely windy. In fact, the road into Horseshoe Bay was covered with downed branches and we nearly drove under a tree just as it crashed onto the highway during the drive. As you might expect from our family, we made Emma get out of the car in the freezing cold and gale force winds – repeatedly – in order to photograph the sweater. The things we do for this blog!
On the photos we took during that drive, you may notice that the cardigan has no buttons or ribbon yet, thus compounding the child cruelty in making Emma pose in the cold and wind! Once we headed back into Deep Cove, I sat by a roaring fire and started to sew.
As always, when Doug and I find ourselves in Vancouver, we head down to Deep Cove to take a photo of us on the spot where we were married. Here we are, at the very spot, a mere 25 years (and a few months) later!
This year I knit cowls for Emma, Leah and Doug for Christmas. Today the sun came out in Vancouver and revealed the city in all of its glory. We went down to Stanley Park to take some photos and enjoy the day.
Emma’s cowl is designed by Isabell Kraemer, and is called Copenhagen Calling. It is a really beautiful pattern and produces a big, lush cowl.
I knit it with two shades of Triskelion Elmet Aran which I bought at Yarnporium, a lovely event organised by the folks at the Yarn in the City blog. I was entranced by the Triskelion display, which had a veritable rainbow of gorgeous shades. The yarn for both Emma’s and Leah’s cowls was purchased from their booth.
Emma’s cowl is in grey and burgundy; the colours are rich and deep. The yarn is very wooly and sturdy – it has substance and feels good in the hands while knitting. I was surprised by how well it bloomed in the wash, producing a lovely, lofty, warm fabric.
I purchased one skein of the grey and two of the burgundy; each skein has 160 meters. The pattern calls for 250 meters of the first colour and 330 of the second. I adjusted the pattern slightly to make up for my lesser yardage. I cast on with the grey, using US7 needles, and ribbed for 2.5″. I knit only 2.5 repeats of the slip-stitch pattern (instead of the called for 4 repeats), which brought me to the end of the grey yarn.
I made a slight change in the pattern, in that just before starting the lace stitch, I decreased 8 stitches evenly around. Many of the photos I have seen of this cowl have a very stretched-out lace section and I was hoping to avoid this. I knit the lace on a US6, and then knit the garter rows with a US5 (as per the pattern). I think the result is perfect.
Unblocked the cowl measured 44″ x 10.5″. I blocked it out quite a bit to open up the lace – it ended up at 50″ x 11″. I could not be happier with the pattern or the yarn; the combination of the two is fantastic and looks beautiful on Emma.
For Leah’s cowl I used the pattern Slip-Zag by Lisa Hannes. I had wanted to make this cowl for a long time and had always envisaged it in green and purple. The Triskelion display at Yarnporium had the most stunning array of greens and purples; it drew me in immediately. There were many beautiful yarns on display at this event, but I found myself unable to walk past their booth.
I used a DK weight for this cowl, which is knit in Triskelion Dyfnaint DK, in the colours Llyr and Cepheus. I had initially chosen a more grass green shade, but upon discussion with the booth attendant, I went for this teal. These two were made for each other – the incredible jewel colours become even more vibrant when paired together.
I cast on 260 stitches and used a US6 needle. The pattern is very intuitive and relaxing. I knit this while on holiday in South Africa and found it a very enjoyable knit. Like the Elmet Aran, the Dyfnaint blocks beautifully. It is wonderfully soft and warm. I will definitely be using these yarns again.
Doug received his cowl a bit early, and I blogged about it here; the linked page includes the free pattern for the design, which I call the Business Class Cowl. These photos, with the late afternoon sunshine, really bring out the beautiful colour of the cowl.
It is knit with Woolfolk Tynd in Darkest Bronze; the sun picks up the bronze shade perfectly.
It was good to end out the year exploring new yarn companies; I had never used either Woolfolk or Triskelion before. They both make fantastic yarns and I already have projects in mind for each.
We had a beautiful day in Stanley Park. This was in many ways a very trying year and it was good to end it with the four of us being silly together on a lovely day.
I normally end the year with a summary of the year’s knitting. I will definitely do that, but will likely post it a few days into the New Year. In the meantime, I wish all of you a healthy and happy New Year, with lots of knitting and with a renewed commitment to compassion, human kindness and a just and democratic society.
Happy New Year from me, Kelly, and from my co-conspirators, Doug, Emma and Leah!