It’s finished!
 In my last post, I chronicled my first attempts to modify the collar of the Escher Cardigan. This lovely design, by Alexis Winslow for Brooklyn Tweed, has a very interesting and fun structure. I knit most of this cardigan exactly to pattern. I made two very simple modifications, and one slightly more complicated one.
The first modification was merely technical: I decided to knit the upper and lower edgings separately and then sew them together. In the pattern, you knit the lower edging first, and then knit the upper edging, while joining it to the lower edging stitch by stitch at the ends of each row using short row construction. I found this a bit fussy (though I am sure it gives a neater edge) so I knit the upper edging back and forth. Here you can see how it looked before I sewed the edges together:
 The second modification was a very tiny one: I used I-cord bind-off instead of a rolled garter stitch edge around the entire edging. To do this, I put the lower edging on a long needle to hold the stitches live while I knit the upper edging. Then, I sewed the two seams, and knit the I-cord around the entire joined edging. (This edging had almost 600 stitches, and took me four days to finish!) Here is how I did the I-cord:
*K3, sl 1 k-wise, k1, psso, sl all 4 sts back on left needle; rep from * until all sts have been worked. Four I-cord sts remain on needle. K4tog, break yarn and draw yarn through final st.
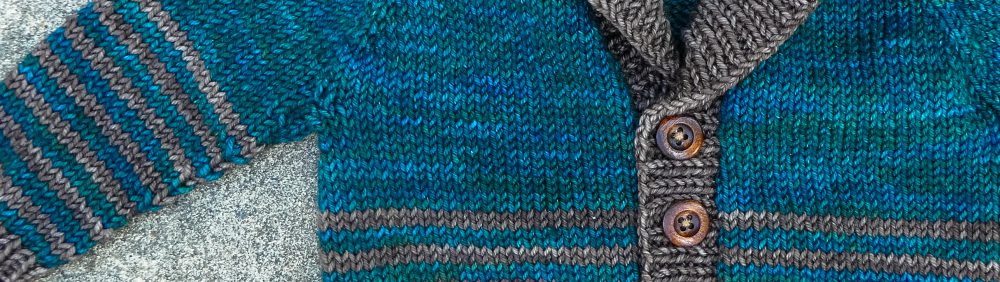
The I-cord looks great and very professional on both sides – this is important because the collar rolls back so both sides are visible. Here is a good photo that shows the I-cord:
 For those of you who carefully read the last post, you can see in the above photo that I carried through on my threat to rip out the upper edging and start again – the shoulder decreases now line up with the triangle. If you recall, the issues I had with the upper edging were that the shoulder decreases in the pattern were too close together and that I needed more stitches on the needle to accomodate my gauge and to put a bit of extra “give” into the shawl collar. Due to all of the extra fabric between the shoulder decreases, I couldn’t get the back neck to narrow anything like it does in the pattern.
Alexis WInslow has a great photo of the back collar and shoulders on her blog post about Escher. It is the third photo from the top. Let me make this clear: I think this looks great. I love the pattern and that’s why I wanted to make this cardigan. But, it was clear that I couldn’t get the collar and shoulders of my Escher to mimic hers. This is due in part to my row gauge, which is always long, and meant that the edges of the triangle on my back were significantly wider (though they did line up with my shoulders). It is also due to having wide shoulders and wanting the shoulder decreases to shape the collar AT my shoulders rather than at the shoulder blades. I tried a number of things to fix this in my first attempt, which you can read about in my last post. Ultimately, I ripped out that attempt (about 5 inches worth) and started again.
 The biggest problem with my first attempt was that I went way overboard with adding more stitches. I didn’t count, just picked up so it “felt” right. I ended up with 258 stitches picked up for the upper edging, compared with 186 specidied in the pattern for my size. This time, I was more modest with 218 (57 on each end and 104 across the back) – an increase of 32 over the pattern. I moved the shoulder decreases out to line up with the edges of the triangle, thus having the width between the shoulder decreases at least five inches wider than the pattern.
I decreased for four inches, and then knit four rows as set, and then started increasing. I put the increases at the same place as the decreases, except that I reversed the sides, so that the wrong side became the right side (since the collar would “fold over” when worn). Here you can see the shapings from the right side:
 and from the wrong side:
 I continued increasing right out to the very edge, and this gave the collar enough “give” so that the shawl collar lies beautifully:
 The problem with knitting something in this shape (like any shrug-type garment) is that until you’ve finished and blocked it, the final fit is a bit of a crap shoot. But when you get it right, it’s pretty cool:
 I left out the button hole because I was modifying the collar significantly enough that I wasn’t sure how to get it placed right. I have a lovely twig-shaped pewter shawl pin (a Christmas gift from Emma) that works perfectly:
 I think it looks great both closed and opened. It is also quite cozy and warm and surprisingly easy to wear.
 I had a few comments from people regarding my perseverance with this pattern; I don’t see it that way. I did do some ripping and put an awful lot of thought into how to modify the collar properly so that it fit me. And I did have conceptual problems with the upper edging instructions. However, the pattern is mostly crystal clear, and very clever; I really liked knitting this. Alexis Winslow’s blog post was extremely helpful (especially her photos of blocking it – not intuitive by any means without being able to see it). And Brooklyn Tweed has superior customer support. I also had wonderful help from Ravellers, particulalry Alice (Ellisj on Rav) – thanks Alice! It worked!
 Emma is still around, so I had both Doug and Emma to make sure we got some decent photos:
 As usual, when they are in charge, I spend most of the photo shoot laughing:
 And that’s all the news that’s fit to print! Good knitting!
Congratulations! The detail on your cardigan is stunning! The icord, amazing. The shoulder increase/decrease work, genius! Kudos to your “crew” for great photography work. I’m blown away by the execution of this complex design.
Wow, Gretchen. Thanks so much! The I-cord was not my idea; I borrowed from Ellisj on Ravelry. It really gives a professional edge.
Wow, it looks fantastic! And I KNOW you feel a great sense of accomplishment. I’m sure you will wear this with pride for many years. Congrats!
Thank you! And with the summer we are having here in England, I will be able to wear it all summer long!
Kelly- It came out beautiful! Love it. Congratulations. May you have many happy years wearing and enjoying all the well deserved compliments.
Thank you so much, Jossie!
It looks fabulous. Congrats on taking the time to make it really work for you; it’s such a unique pattern and you well it well!
It was a new type of construction for me. I’m just happy that it worked out. Thanks for commenting.
Escher would be proud. Just beautiul.
🙂 I love Escher. Thanks!
Love it! it looks fabulous on you. the iCord looks super – – great idea!
Thank you, Karen. I’m glad I put the time in to get it right.
You look fabulous in this. I bow down to your tri-colored knitting.
Pingback: Pattern Radar July 2015 | Knitigating Circumstances
Pingback: My Year in Review 2015 | Knitigating Circumstances
Pingback: Knitigating Circumstances turns five! | Knitigating Circumstances
Pingback: Worsted is for winter | Knitigating Circumstances
I’m so glad I found your project and followed the link for these detailed notes. I’ve had the yarn for this pattern probably since about the time you wrote this post. I’m doing a gauge swatch now and was just reading about all of the fit issues other knitters experienced. Your sweater has the best fit I’ve seen and I’m sure I’ll use some of the adjustments. The collar shaping and edging, particularly, are very clever. Thank you for sharing.